Design and build guidelines
Over the years we have gained a wealth of experience installing sliding folding shutters. Although each installation is unique, most of them share several common characteristics.
In this overview you'll find several practical considerations regarding the design and installation of sliding shutters. Use this information if you're incorporating a FlexiGlide shutter in your design or if you're preparing the opening for a sliding folding shutter.
Support structure

The curtain of a sliding shutter hangs from an extruded aluminium track, which fixes onto the ceiling structure. Because we screw this top-track into place when we install the shutter, you'll need to provide a medium for us to screw into. Typically, this is a timber or plywood support.
The sliding shutter support must be able to carry the weight of a fully stacked door at any point along its length. FlexiGlide shutters range in weight from 5.9 to 12.2 kilograms per square metre. Please see our range of sliding shutters for more information about shutter weights. We can also calculate exact shutter weights for you. Please contact us for more information.
Recessing the top-track

The shutter's top track can be either recessed, or left visible. When recessing the track, we recommend you install the ceiling after the shutter. This way you can neatly finish your ceiling right up to the track.
Amount of stacking space
How much space does a sliding shutter need to stack into? We recommend you allow a stacking space of 20% of the opening width. So for example, if your opening is 5 metres wide, you'd allow 1 metre for stacking the shutter.
In practice, FlexiGlide shutters need a little less room to stack into. So if you have a limited amount of space, you can get away with less than 20% of opening width. However, as an absolute minimum, you need to allow a stacking space of 16% of the opening width.
Folding shutters can open to either one or two sides. For a bi-parting sliding shutter the stack for each side is a ratio of its length.
The stacking space a particular shutter needs depends on several factors, including the amount of locking posts. We can advise you on the precise stacking space and give you a drawing with exact dimensions. Please contact us for more information.
Concealing the stack
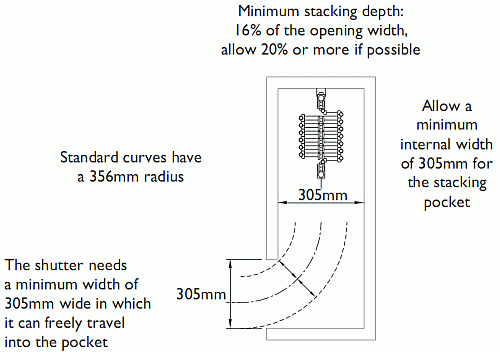
It's possible to conceal the stack of a folding shutter when it's not in use. A good way of doing this is to build a hollow partition that the shutter folds into. A hinged door in front of this partition completely hides the folded shutter from sight. Please note: the hinged door is a builder's or shopfitter's item; we don't supply this with the shutter.
A partition for the shutter to stack into needs to be a certain width. If you want to curve the stack (for example in a 90 degree angle), you must allow a minimum internal partition width of 305mm. If you plan to stack the curtain in the same line as the shutter, the minimum internal partition width needs to be 228mm.
Depth of floor sockets
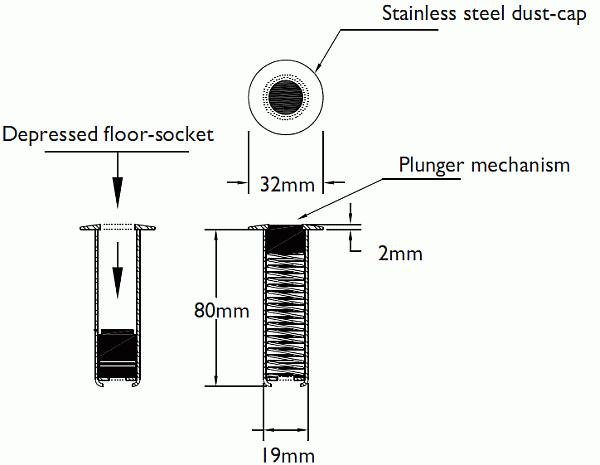
FlexiGlide shutters don't have a bottom track. Instead, they have integral locking posts spaced at regular intervals. Steel shoot bolts in each of these posts lock into floor sockets when the shutter closes.
FlexiGlide floor sockets are 67mm deep and 32mm wide. They have a stainless steel dust cap that protects the spring mechanism underneath. When the shutter is not in use, the spring mechanism pushes the dust cap to the top of the socket where it neatly closes off the hole.
Number of locking posts
Our sliding shutters lock with a shoot bolt mechanism into the floor and ceiling. These shoot bolts sit in the shutter's locking posts. FlexiGlide shutters have regularly spaced locking posts. On a countertop application, posts are spaced between 1200 and 1500 mm. On a ceiling to floor application, posts are spaced every 2750 to 3000 mm. These spacings result in a high level of security. However, for added security it's possible to install additional locking posts.
Standard curves and special curves
FlexiGlide sliding folding shutters can run in a straight line or follow a curve. Standard curves are 90 and 45 degrees, but our shutters can also follow special radius curves. We can supply custom-made curves with radii ranging from unlimited (straight line) to 800mm.

Standard finishes and special colours
FlexiGlide shutters are available in an anodised natural finish or a standard white, bronze, or black acrylic paint. At an additional cost, we can also paint your sliding shutter to almost any RAL equivalent colour.
We normally supply the track to match the colour of the shutter. But you can also have the track in a different colour, for example to match your ceiling. Please contact us for more information.
Use of sliding shutters on counters

A sliding shutter is an excellent solution for securing a counter. Because they can follow almost any curve, FlexiGlide shutters work especially well on curved counters such as reception desks and food serveries.
The two most common ways of installing a sliding shutter on a counter are in front or on top of the counter.
Sliding folding shutter in front of a counter

It is generally best to have a full-height sliding shutter in front of the counter. In this way, the counter is completely behind the shutter and therefore better protected. At the same time the counter adds strength to the shutter if it is behind it. Also, in the case of an open style sliding shutter (such as the Classic Chainlink or Vision Guard), there is more distance between the shutter and anything left on the counter, which makes it more difficult for anyone to reach through to items on the counter.
Another reason for placing the sliding folding shutter in front of a counter is that it avoids difficulties with the counter layout. Most counters have a high section and a lower section for people with disabilities. To adequately secure both sections leaves two choices; either the shutter needs to be split into a higher and a lower part, or there needs to be an alternative solution for securing the gap underneath the sliding shutter at the lower section of the counter.
Finally, installation in front of the counter avoids conflict between the shutter and other things on the countertop.
Sliding folding shutter on top of a counter
If it isn't practical or desirable to have the folding shutter in front of the counter, it's possible to run the shutter on the counter-top. If you consider this, you must keep in mind that:
- There has to be enough space on the counter for the panels of the shutter to swivel.
- There has to be a solution for any disability areas. This could be a custom-made panel (supplied by others) that slides or hinges into place underneath the section of sliding shutter that spans the disability area.
- The counter must be sufficiently thick (we recommend 75mm) to take the shutter's locking sockets (please note that we can slightly shorten the locking sockets if the counter is not thick enough).
Please contact us for more information on installing a sliding folding shutter on a countertop.